[et_pb_section fb_built=”1″ _builder_version=”4.17.4″ custom_padding=”0px||||false|false” global_colors_info=”{}” theme_builder_area=”post_content”][et_pb_row _builder_version=”4.16″ background_size=”initial” background_position=”top_left” background_repeat=”repeat” global_colors_info=”{}” theme_builder_area=”post_content”][et_pb_column type=”4_4″ _builder_version=”4.16″ custom_padding=”|||” global_colors_info=”{}” custom_padding__hover=”|||” theme_builder_area=”post_content”][et_pb_text _builder_version=”4.20.0″ _module_preset=”default” global_colors_info=”{}” theme_builder_area=”post_content”]
These Buttery Scones with Berries come together easily and have a flakey texture sure to make you swoon!
[/et_pb_text][et_pb_text _builder_version=”4.20.2″ _module_preset=”default” global_colors_info=”{}” theme_builder_area=”post_content”]
Some of the links in this post are affiliate links. As an Amazon Associate, I earn from qualifying purchases. This means if you click on the link and purchase an item, I will receive an affiliate commission at no additional cost to you. All opinions remain my own. Please view my privacy policy for more details.
[/et_pb_text][el_masonry_gallery image_ids=”1789,1787,1802″ number_of_columns=”3″ image_size=”large” module_class=”gallery-fit” _builder_version=”4.20.0″ _module_preset=”default” max_width=”83%” module_alignment=”center” global_colors_info=”{}” theme_builder_area=”post_content”][/el_masonry_gallery][et_pb_text _builder_version=”4.17.4″ _module_preset=”default” global_colors_info=”{}” theme_builder_area=”post_content”]
These Berry Scones are a such a crowd pleaser that I love to bring on travels near or far. They are delicious and filling and are a breakfast (or snack) you will actually look forward to. These berry scones are equally good enjoyed at home curled up with your favorite coffee or tea!
[/et_pb_text][et_pb_text _builder_version=”4.17.4″ _module_preset=”default” global_colors_info=”{}” theme_builder_area=”post_content”]
What is the SEcret to making good scones?

Honey vs Sugar
I prefer to use honey instead of granulated sugar, but feel free to use either. There were always commercial bee hives from Snowy Mountain Honey Ranch on our land so that meant there was always plenty of fresh honey around. Additionally it has beneficial health properties so it continues to be my preference if I need to add sweetness.
Is Buttermilk or Heavy Cream Better for Scones?
Both Buttermilk and Heavy Cream are great additions to scones. Heavy cream leads to a more rich and dense scone, while buttermilk will give you a more tender and tall scone.
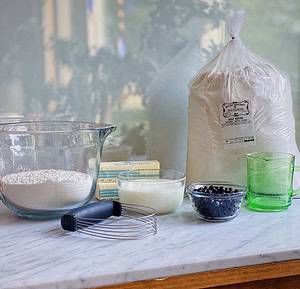
Start by mixing your flour and baking powder together in a large bowl. Then mix your honey (or granulated sugar) and salt into your buttermilk in a medium bowl until fully dissolved. The buttermilk will help keep them moist and activate the baking powder so they get tall!
If you don’t have buttermilk on hand you can simply measure a tablespoon less than 1 cup of milk into a bowl and then add about 1 tablespoon of either lemon juice or white vinegar to make 1 cup. Stir the mix to combine and let it set for about 5 minutes, then use as you would buttermilk! (This will be a bit chunky.) Or you can substitute with heavy cream.
Is it better to use oil or butter for scones?
Adding oil can be a bit healthier possibly, but you will miss out on some of the texture butter offers. Adding cold butter creates beautiful pockets in the dough as the scones bake.
Now cut your cold butter into roughly 1/2″ chunks. This will help distribute it evenly throughout your flour mixture without having to overwork the dough. I always use salted butter, but feel free to use either salted or unsalted. Add the butter cubes to your flour mix and using a pastry cutter (or fork) cut in the butter until you have pea-sized crumbs.
[/et_pb_text][el_masonry_gallery image_ids=”257,183,186,184″ image_size=”large” module_class=”gallery-fit” _builder_version=”4.20.0″ _module_preset=”default” max_width=”100%” module_alignment=”center” global_colors_info=”{}” theme_builder_area=”post_content”][/el_masonry_gallery][et_pb_text _builder_version=”4.17.4″ _module_preset=”default” global_colors_info=”{}” theme_builder_area=”post_content”]
Bringing It All Together
Add your buttermilk mixture and stir until the milk is just combined. You will want to finish bringing the dough together with your hands so it doesn’t get over-mixed. This is what will give the scones their flakey texture. Once you have a shaggy dough that is evenly moist let it rest for a minute while you flour your work surface.
Rolling It Out
Turn out your dough onto a well floured surface and flour your rolling pin a bit as well.
I’ve been very fortunate that all of my rolling pins have been passed down to me from my grandmothers and so I’ve never had to purchase one. These rolling pins are all so special and I love thinking about who they belonged to as I bake things! If you do need to purchase a rolling pin, I suggest a french one like this. I’ve found that handles get in the way and even tend to break off over time.
Using your rolling pin, apply even pressure and roll your dough to a roughly 14″x8″ rectangle. You should be able to see your chunks of butter evenly throughout. Make sure the long side is facing you.
[/et_pb_text][el_masonry_gallery image_ids=”182,181″ number_of_columns=”2″ image_size=”large” module_class=”gallery-fit” _builder_version=”4.20.0″ _module_preset=”default” max_width=”61%” module_alignment=”center” global_colors_info=”{}” theme_builder_area=”post_content”][/el_masonry_gallery][et_pb_text _builder_version=”4.17.4″ _module_preset=”default” global_colors_info=”{}” theme_builder_area=”post_content”]
Dot with Fresh Berries
Soften 4 tablespoons of butter on the counter or in the microwave so that it is spreadable, but not completely melted. (I recommend doing this at around 5 second intervals because each microwave will vary in power and butter melts fast.) Spread the softened butter over your dough. Make sure your berries are as dry as possible and dot them over your buttered dough. Press down a bit over your berries to help them adhere to your dough.
If you don’t have access to huckleberries (find out more about them here) these work great with strawberries, blueberries, cranberries or many other wild berries.
How to Create Flaky Layers
Now, with the long side facing you, take the dough and bring the bottom third up over the center. Next take the top third and bring that down to meet your bottom edge. Then fold it in half, lengthwise.
[/et_pb_text][el_masonry_gallery image_ids=”179,180″ number_of_columns=”2″ image_size=”large” _builder_version=”4.20.0″ _module_preset=”default” max_width=”68%” module_alignment=”center” global_colors_info=”{}” theme_builder_area=”post_content”][/el_masonry_gallery][et_pb_text _builder_version=”4.17.4″ _module_preset=”default” global_colors_info=”{}” theme_builder_area=”post_content”]Next, using your rolling pin again, begin to flatten out into a rectangle about 8″x4″ with the long edge facing you. You may begin to see your berries through the dough.[/et_pb_text][el_masonry_gallery image_ids=”189,190″ number_of_columns=”2″ image_size=”large” _builder_version=”4.20.0″ _module_preset=”default” max_width=”70%” module_alignment=”center” global_colors_info=”{}” theme_builder_area=”post_content”][/el_masonry_gallery][et_pb_text _builder_version=”4.17.4″ _module_preset=”default” global_colors_info=”{}” theme_builder_area=”post_content”]
Cut the Scones
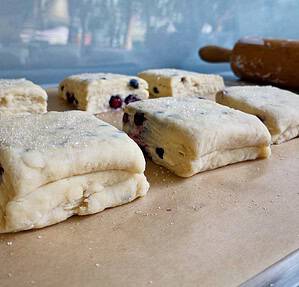
Then cut your dough, using a sharp knife, into either 8 or 12 squares. If you want larger scones (8) cut in half down the middle and then into fourths like the picture below. For smaller scones (12) cut into thirds lengthwise and then into fourths. Or if you would like to cut them into triangles simply cut each square in half on the diagonal. The smaller scones will require less baking time so start checking them earlier.
[/et_pb_text][el_masonry_gallery image_ids=”187,1786″ number_of_columns=”2″ image_size=”large” _builder_version=”4.20.0″ _module_preset=”default” max_width=”76%” module_alignment=”center” global_colors_info=”{}” theme_builder_area=”post_content”][/el_masonry_gallery][et_pb_text _builder_version=”4.17.4″ _module_preset=”default” global_colors_info=”{}” theme_builder_area=”post_content”]
Bake

Bake in a 375 degree oven for 20 – 30 minutes, until your scones are golden brown. Remove from oven and cool on a wire rack.
You can enjoy your Buttery Berry Scones warm or let them cool and save them for later. (Good luck saving them though! I was barley able to keep any long enough to photograph the finished product.)
[/et_pb_text][et_pb_text _builder_version=”4.17.4″ _module_preset=”default” global_colors_info=”{}” theme_builder_area=”post_content”]
How to Serve?
These are wonderful warm served with a bit of faux clotted cream or Irish butter! They go perfectly with your favorite tea or try them with my Oatmeal Cookie Latte.
[/et_pb_text][el_masonry_gallery image_ids=”1799,2774,1789″ number_of_columns=”3″ image_size=”large” _builder_version=”4.20.0″ _module_preset=”default” max_width=”77%” module_alignment=”center” global_colors_info=”{}” theme_builder_area=”post_content”][/el_masonry_gallery][et_pb_code _builder_version=”4.17.4″ _module_preset=”default” global_colors_info=”{}” theme_builder_area=”post_content”]

Buttery Scones with Berries and Buttermilk
Ingredients
- 1 cup Cold Buttermilk
- 1/2-3/4 cup Honey or Granulated Sugar depending on the sweetness of your berries
- 1 teaspoon Salt
- 3 cups All-Purpose Flour + more for dusting
- 2 1/2 teaspoons Baking Powder
- 1 cup Cold Butter divided
- 1/2 cup Fresh Berries patted dry
- Raw or Demerara Sugar for sprinkling
Instructions
- Preheat your oven to 375 degrees.
- Mix your flour and baking powder in a large bowl. Next cut 10 tablespoons of cold butter into roughly 1/2″ cubes. Work your cold butter cubes into the flour mixture with a pastry cutter until you have roughly pea sized crumbs.
- Then combine your milk, honey or sugar and salt in a medium bowl until dissolved. Taste your berries and adjust your sugar/honey depending on their sweetness.
- Pour milk mixture into butter and flour crumb and mix with a spoon until the milk is just combined. Then use your hands to bring the mixture to a shaggy dough taking care to not overwork. Rest your dough for a minute while you flour your work surface well. Transfer your dough and roll out to a 14″x8″ rectangle making sure the long side is facing towards you.
- Soften 4 tablespoons of butter in the microwave at 5 second intervals to avoid melting. Evenly spread your dough with the softened butter and sprinkle with your berries of choice. Press down lightly on the berries to help them adhere to the dough.
- Now, with the long side facing you, take the dough and bring the bottom third up over the center. Next take the top third and bring that down to meet your bottom edge.
- Then fold it in half, lengthwise and using your rolling pin again, begin to flatten out into a rectangle about 8″x4″ with the long edge facing you. You may begin to see your berries through the dough.
- Then cut your scones, using a sharp knife, into either 8 or 12 squares. If you want larger scones (8) cut in half down the middle and then into fourths. If you would like smaller scones (12) cut into thirds lengthwise and then into fourths. You can also create the traditional triangular scones by cutting each of your squares in half on the diagonal. Smaller scones will require less baking time than the larger ones.
- Transfer your cut scones onto a parchment lined, rimmed baking sheet. Then melt the remaining 2 tablespoons of butter and brush the tops of your scones with it. Sprinkle with a bit of raw sugar or demerara sugar.
- Bake for 20 – 30 minutes, until your scones are golden brown. Remove from oven and cool on a wire rack. Serve warm or cool and store in an airtight container for later.

Leave a Reply